|
|
 |
Home > PGOPR >3ESS |
|
 |
 |
 |
 |
- Super Small
- Voltage System Negative Sequence Over-Current Circuit Breaker Lock Protection
- Over-Current Circuit Breaker Lock Protection
- Separate Set-up for each Operation
Delay / Operation Delay Time
- Wide Range of Set-up
- Wide Range of Free Voltage
- Operation Indicator and Identification
of Actual Current (LED)
- Manual (Immediate) / Electrical Recovery
- Hard Condition Resistant
- Super Economic in Power Saving |
|
 |
|
|
|
 |
- Over Current Protection - Operating after the set up {O TIME}
- Circuit Breaker Protection - Operated by Over Current
- Lock Protection - As soon as
{O TIME} is over
- Operating Current Identification
- Green (MONITOR) LED indicating Power and Operation
- Red (TRIP) LED indicating Over Load Status and Operation under Over Loaded Power |
|
|
|
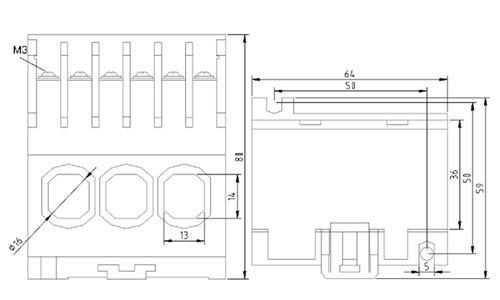
| Rated Current |
PG 06 - 3ESS - 220 |
0.5A ~ 6.5A |
| PG 30 - 3ESS - 220 |
3A ~ 30A |
| PG 60 - 3ESS - 220 |
5A ~ 60A |
| PG 120 - 3ESS - 220 |
10A ~ 120A |
| Time Set-up |
Operation Delay |
D-TIME |
0.2sec ~ 60sec |
| Operating Time |
O-TIME |
0.2sec ~ 12sec |
| Recover |
Manual(Immediate)/
Electrical(Timely) Recovery |
| Operating Time Spec |
Fixed Time |
| Error Tolerance |
Current |
±15% |
| Time |
±15% |
| Operating Power |
Voltage 3-Phase |
AC 90V ~ 260V |
| Frequency |
50 / 60㎐ |
| Contact Support |
Type |
1-SPDT(1C) |
| Status |
Normal Time Element (95 96 Close) |
| Rated Current |
AC 250V / 3A Load Resistant |
| Power Saving |
Resistance |
between the outer
port and the circuit |
Over 50㏁ for DC 500V Megger |
| Internal Voltage |
between the outer
port and the circuit |
2.0kv normal frequency for 1 min |
| between contact points |
1.0kv normal frequency for 1 min |
| between circuits |
2.0kv normal frequency for 1 min |
| Operation Environment |
Temperature |
Not in Use |
-30℃ ~80℃ |
| When Operating |
-20℃ ~65℃ |
| Humidity |
30~85% RH with no dew condensation |
| Voltage and Rated Current of Terminal |
Over AC 250V 5A |
| Power Consumption |
Below 0.5W |
| Outer Material |
35mm DIN-Rail / Panel |
 |
| |
 |
| 1. Check List Before Use |
Please make sure that the product specifications are the same as ordered.
Check to ensure that no damage has occurred during delivery, and that there are no defects or missing items. |
| 2. Operation Time Set-up |
Operation Delay Time (D-Time): this refers to the delayed time of the operating relay due to over current from the running motor. This requires a precise set-up, since the over current by lock lets it operate after the D-Time and O-Time have passed. Operating time is set by the marks on the time control knob.
For initial set-up, turn the D-Time and O-Time knobs to the maximum setting, and start the motor to measure the operating time.
Time: confirmed when the green lamp dims.
Operating Time: the period of time during which the red lamp (O.L) is illuminated
(1) Set-up the time to be slightly longer in consideration of the operating time of the motor
(2) Operating Time Set up for SS Type: controllable withing a range of 0~60 sec. (0.2~12 sec. for O-Time)
(3) Once the time is fixed, when it is locked, it will be tripped after D-Time and O-Time are passed after over current occurs, at which time the red LED will illuminate.
(4) When over current occurs while operating, it will be tripped after O-Time is passed.
|
| 3. Rated Current Set-up |
(1) Turn the current control knob to the maximum setting and run the motor.
(2) While operating, turn the knob counter-clock wise. The point at which the over current indicator lamp (O.L) illuminates red, is the actual load current (100%). Once you have reached this point, turn the knob slightly clockwise so that the current will be set to 110% ~ 120% of the actual current.
|
| 4. To Confirm Operating |
(1) When only the power is on, if the TEST button is pressed, the power lamp of the motor protective relay illuminates brightly, and dims after D-Time has been passed. In addition, the over current indicator lamp (O.L) dims, brightening after O-Time has been set, and then the power lamp turns off as it trips.
(2) When it trips, press the RESET button. The over current indicator lamp will then turn off, and the power lamp will again illuminate as the initial state is recovered. |
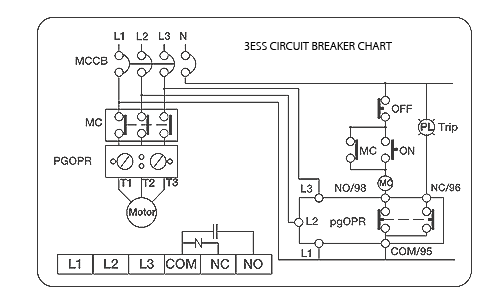
| 5. Circuit Breaker Chart |
 |
|
|
|
|
|